A novice introduction to Ethereum
If you are new to Ethereum and want to quickly understand what’s going on, you’re on the right track. This post is exclusively made for you.
First, we’ll list and understand the key concepts of Ethereum.
Second, you’ll code your own smart contract, compile it, deploy it on the Ethereum blockchain test network, and play with it.
Without further ado, let’s dive into it.
Key concepts
Blockchain
A blockchain is a growing list of records, called blocks, which are linked using cryptography. Each block contains a cryptographic hash of the previous block a timestamp, and transaction data. By design, a blockchain is resistant to modification of the data. It can be thought of as a global ledger or a database of all transactions containing the entire history of all transactions on the network.
Ethereum
Ethereum is an open source, public, blockchain-based distributed computing platform and operating system featur- ing smart contract (scripting) functionality.
Ethereum Virtual Machine
The Ethereum Virtual Machine (EVM) is the runtime environment for smart contracts in Ethereum. A runtime environment is the execution environment provided to an application or software by the operating system. Each full node in the Ethereum network locally runs its proper EVM. The Ethereum blockchain database, which contains all the transactions and smart contracts, is maintained and updated by many nodes connected to the network. Each and every node of the network runs the EVM and executes the same instructions. For this reason, Ethereum is sometimes described evocatively as a “world computer”.
Miner
Ethereum, like all blockchain technologies, uses an incentive-driven model of security. Consensus is based on choosing the block with the highest total difficulty. Miners compete to produce blocks which the others check for validity.
Proof-of-Work
Miners are tasked with solving a complex mathematical problem in order to successfully “mine” a block. This is known as a “Proof-of-Work”. Any computational problem that requires orders of magnitude more resources to solve algorithmically than it takes to verify the solution is a good candidate for proof of work. Ethereum uses the ”Ethash” as its Proof-of-Work.
! In the near future Ethereum is planning to switch to Proof-Of-Stake !
EDIT: migration to proof of stake finally happened in September 2022.
Ethereum Accounts
There are two types of accounts in Ethereum and understanding this distinction is essential !
- Externally Owned Accounts :
- Controlled by a private key, and if you own the private key associated with it, you have the ability to send ether and messages from it.
- has an ether balance.
- can send transactions (ether transfer or trigger contract code).
- have no associated code.
- Contracts Accounts
- have an ether balance.
- have associated code.
- code execution is triggered by transactions or messages (calls) received from other contracts.
- when executed; perform operations, manipulate its own persistent storage, can call other contracts ..
Gas
One of the major concepts that must be understood in Ethereum is Gas !
When a contract is executed as a result of being triggered by a message or transaction, every instruction is executed on every node of the network.
This has a cost: for every executed operation there is a specified cost, expressed in a number of gas units.
Gas is the name for the execution fee that senders of transactions need to pay for every operation made on an Ethereum blockchain. Gas is purchased for Ether from the miners that execute the code.
Gas and Ether are decoupled deliberately since units of gas align with computation units having a natural cost, while the price of Ether generally fluctuates as a result of market forces.
In other words, Gas is a unit of measuring the computational work of running transactions or smart contracts in the Ethereum network.
Different kinds of transactions require a different amount of gas to complete.
-
Gas limit refers to the maximum amount of gas we’re willing to spend on a particular transaction. A higher gas limits mean that more computational work might be done to execute the smart contract. In some cases, the actual needed Gas can be sometimes hard to estimate before actually executing the transaction. Gas limit acts as a safety mechanism to protect us from using all our funds due to buggy codes or an error in the smart contract.
-
Gas Price refers to the price in Gwei that we’re willing to pay for each unit of Gas used. Miners will “work on” and execute transactions that offer a higher gas price, as they’ll get to keep the fees. Therefore, they will be incentivized to prioritize transactions that have a higher Gwei. If we want our transaction to be executed at a faster speed, then we have to be willing to pay a higher gas price !
The actual transaction fee is calculated such that :
- TransactionFee = GasUsedByTransaction x GasPrice
At the time of writing this post, the recommended Gas Prices in Gwei according to https://ethgasstation.info/
is depicted as follows :

This means that if we intend to execute our transaction :
- In less than 2 minutes then fix the Gas price to 20 Gwei
- In less than 5 minutes then fix the Gas price to 16.6 Gwei
- In less than 30 minutes then fix the Gas price to 14 Gwei
Of course the Gas price depends on the network congestion; the more transactions we have in the network, the more gas prices increase !
Now that we’re done with the major key concepts of Ethereum, we will be able code, compile, deploy and test our first smart contract.
Deploying a smart contract
The workflow for deploying a smart contract is:
- Start an Ethereum node
- Compile a Solidity smart contract using solc and get back the binary
- Deploy the compiled contract to the network
- Interact with the contract using web3.js’s JavaScript API
Deploying a compiled contract to the network (Step 3) uses gas and hence costs ether.
In the other hand, interacting with the contract may cost ether too depending on the type of invocation.
For the sake of this tutorial we will use the Ethereum blockchain test network Ropsten. Ethers in Ropsten don‘t have any real value so we don‘t have to spend any real money.
Even though the workflow remains the same, there are a lot of approachs used to deploy smart contracts in the Ethereum blockchain. In this tutorial we will stick to a very simple approach and will use MetaMask and Remix tools.
-
MetaMask is a browser extension that acts as a bridge between internet browsers and the Ethereum blockchain. It is a secure identity vault, which lets us manage identities on different sites and sign blockchain transactions. It is easy to use and convenient for testing, as it is able to connect to a variety of Ethereum nodes and test blockchains.
-
Remix is a browser-based compiler and IDE that enables users to build Ethereum contracts with Solidity language and to debug transactions. It is very convenient for deploying and debugging contracts for testing purposes.
Coding the smart contract
As coding a smart contract directly with EVM Bytecodes might be painful, ll use a high-level language mainly designed to help us avoid the pain.
This language is Solidity !
Solidity is an object-oriented, high-level language for implementing smart contracts. It is statically typed, supports inheritance, libraries and complex user-defined types among other features.
With Solidity we can create contracts for uses such as voting, crowdfunding, blind auctions, and multi-signature wallets.
The Solidity compiler, compiles our smart contract and transforms it to an EVM Bytecode understandable by the Ethereum Virtual Machine.
To demonstrate the process, we will try to deploy a smart contract that controls a faucet.
A faucet is a relatively simple thing: it gives out Ether to any address that asks, and can be refilled periodically.
// Version of Solidity compiler this program was written for
pragma solidity ^0.4.22;
// Our first contract is a faucet !
contract Faucet {
	address owner ;
	// Contract constructor : set owner
	function Faucet() public {
		owner = msg.sender;
	}

	// Contract destructor
	function destroy() public {
		require(msg.sender == owner);
		selfdestruct(owner) ;
	}

	// Give out ether to anyone who asks
	function withdraw(uint withdraw_amount) public {
		// Limit withdrawal amount
		require (withdraw_amount <= 0.1 ether) ;
		// Send the amount to the address that requested it
		msg.sender.transfer(withdraw_amount) ;
	}

	// Accept any incoming amount
	function () public payable {}
	function getOwner() public view returns (address) {
		return owner;
	}
}
This code is interesting as it shows different aspects of what a smart contract can be used for in practice. Let’s look at how each method of the smart contract works :
- Faucet() : This method is the constructor of the smart contract and is executed once when the contract is created. It sets the state variable owner to the address account that creates the contract.
- destroy() : This method is the destructor of the smart contract and calls self destruct. The self destruct operation removes the code from the blockchain and sends the remaining Ether stored at the contract address to a designated target.
- withdraw(uint withdraw_amount) : This function takes one unsigned integer argument named withdraw amount. It uses the built-in Solidity function require to test a precondition, that the withdraw amount is less than or equal to 0.1 Ether. Next comes the actual withdrawal msg.sender.transfer(withdraw_amount). The function transfer is a built-in function that transfers Ether from the current contract to the address of the sender.
- fallback : If we make a transaction that sends Ether to the contract address, as if it were a wallet, this function will handle it. That’s why it is defined as public and payable, which means it can accept Ether into the contract.
- getOwner() : This method simply returns the value of the state variable owner. As it only reads data and doesn’t write on the blockchain, it is executed without having to pay any fee.
Compile the smart contract
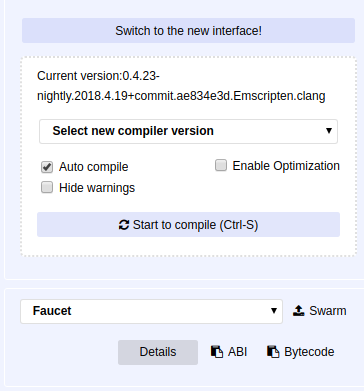
We compile the contract using Remix IDE with the appropriate compiler version.
After compilation, if we are curious about the generated EVM bytecode it is possible to get it from Remix by clicking on ”Details”.
Register contract on blockchain
In order to deploy and use this smart contract, we need Ether. As we’re in the Ropsten test network, we can actually get free Ether to our account using https://faucet.metamask.io/
After compiling the smart contract to EVM bytecode. The next step is to ”register” the contract on the Ethereum blockchain.
Registering a contract on the blockchain involves creating a special transaction whose destination is the address 0x0000000000000000000000000000000000000000, also known as the zero address.
The zero address is a special address that tells the Ethereum blockchain that we want to register a contract. Fortunately, the Remix IDE will handle all of that and sends the transaction to MetaMask.
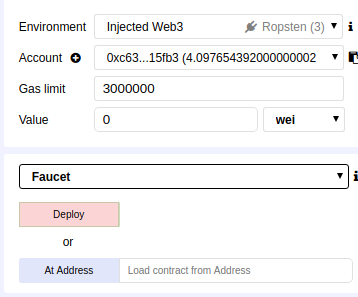
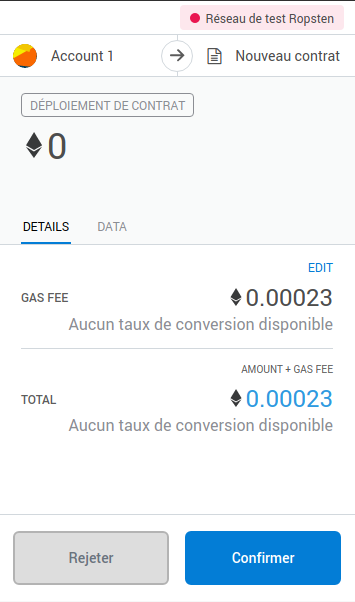
After clicking on Deploy, we will get prompted with the MetaMask asking us to confirm the transaction and pay the transaction fee.
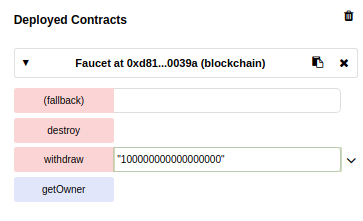
Interact with the smart contract
As for now, the contract has been created and deployed into the blockchain. Hence, it is now possible to call its methods. We can for example start by calling the getOwner method and see that it doesn’t require any fee as it only reads data from the blockchain.
It is also interesting to call the withdraw method. However, the created contract has no Ether (zero balance) so it won’t be able to send Ether.
The first step will then be to send it some Ether and we can do this via MetaMask.
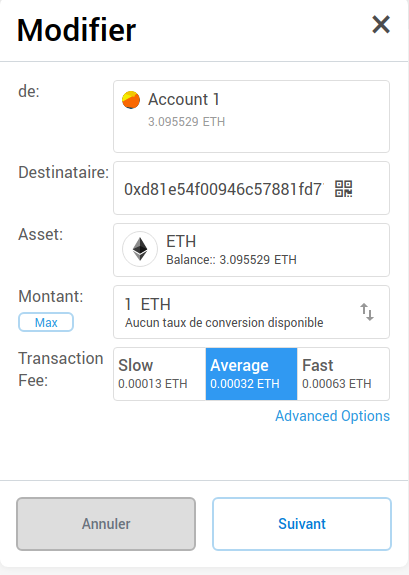
When the transaction is mined and the execution succeeded, we can proceed by calling the withdraw method.
Again, the Remix IDE makes it simple and provides us with an intuitive interface.
We provide the input and simply click on the ”withdraw” button. The provided input in this example is ”100000000000000000” in Wei, which corresponds to 0.1 Ether.
Calling the withdraw method caused the contract to run inside the EVM.
First it called the require function and validated that the requested amount was less than or equal to the maximum allowed withdrawal of 0.1 Ether. Then it called the transfer function to send the Ether.
Running the transfer function generated an internal transaction that deposited 0.1 Ether into the function caller address, from the contract’s balance.
And voilà !
Conclusion
Let’s sum it up.
We first, introduced some important key concepts which are necessary to understand the basics of the Ethereum blockchain.
Next, we wrote a Faucet contract in Solidity.
We used the Remix IDE to compile the contract into EVM bytecode, then used Remix to form a transaction and registered the Faucet contract on the Ropsten blockchain Ethereum test network.
Once created, the Faucet contract got an Ethereum address, we sent to it some Ether.
Finally, we constructed a transaction to interact with it, call the withdraw function and successfully asked for 0.1 Ether.
The contract checked the request and sent us back the 0.1 Ether. We’ve also learned how the estimation of the transactions’ costs works and what are its limitations.
We are now done with visiting the basic concepts of Ethereum. You are now ready to explore it by yourself.
But wait! You thought I’ll leave you without a bonus :o ?
BONUS: Estimating transaction costs
Estimating the transactions costs is quite tricky.
The total Ether cost of a transaction is based on 2 factors:
-
GasUsed : is the actual total Gas that is consumed by the transaction. Each operation in the EVM was assigned a number of how much Gas it consumes. GasUsed is the sum of all the gas for all the operations executed.
-
GasPrice price (in Ether) of one unit of gas specified in the transaction.
The total cost is calculated by the following formula :
Totalcost = GasUsed x GasPrice
Each low level operation available in the EVM is called an OPCODE.
OPCODES includes operations such as ADD adding two integers together, BALANCE getting the balance of an account, and CREATE creating a new contract with supplied code.
Each of these OPCODEs has a Gas value associated with it.
For example, ADD uses 3 Gas while MUL (multiply two integers) uses 5 Gas, so MUL is more complex than ADD.
It is important to note that all transactions cost 21000 Gas as a base. So if we are just transferring funds and not interacting with a contract, our transaction takes 21000 Gas. If we are interacting with a contract, our transaction takes 21000 Gas plus any Gas associated with running the contract.
The current Gas Value for some elementary operations :
| Operation Name | Gas Used | Remark |
|---|---|---|
| STOP | 0 | Halts execution |
| ADD | 3 | Addition operation |
| SUB | 3 | Substraction operation |
| MUL | 5 | Multiplication operation |
| DIV | 5 | Multiplication operation |
| LT | 3 | Less-than comparison |
| GT | 3 | Greater-than comparison |
| BALANCE | 400 | Get balance of the given account |
| SLOAD | 200 | Load word from storage |
| SSTORE | 20000 or 5000 | 20000 is paid when storage value is set to non-zero from zero, 5000 otherwise |
| CREATE | 32000 | Create a new account with associated code |
More details for all the other OPCODEs are described in Ethereum yellow paper (Appendix G - Fee schedule).
To illustrate the estimation of the transaction cost, let’s consider a contract that just multiplies 2 numbers. The EVM OPCODE MUL consumes 5 Gas and the default Gas price (as of June 2019) is 3 Gwei.
The approximate cost, would be :
5(Gas) × 3(Gwei) = 15 Gwei = 0.000000015 ETH
This is a simplification since it ignores some costs, such as the cost of passing the 2 numbers to contract, before they can even be added, but you got the idea!
In fact there are tools to estimate the Gas that will be needed for a transaction (such as the web3.eth.estimateGas function) but it is important to note that the Gas estimation is not 100% accurate. The estimation can actually differ from the actual Gas used when later sending a transaction, as the state of the smart contract can be different in each execution.
Even though, some tools and functions like web3.eth.estimateGas try to estimate the Gas, it is important to keep in mind that it’s not always accurate.
To illustrate such inacurracy, we can imagine a simple contract which checks the most recent block hash and then calls another large, gas-guzzling contract only if the 10th bit in the block hash is a 1.
If we use web3.eth.estimateGas function to measure the consumption of a transaction which calls this simple contract, the result will depend entirely on whether the most recent block contained a 1 in the 10th bit of its block hash. If a new block is published between when we call web3.eth.estimateGas and when the transaction is actually included, our estimate has a 50% chance of being wildly wrong.
This may seem like a weird example, but lots of contracts use block hashes as a source of entropy, and change their behaviour based on what the hash is.
That is, if there is any way for the consequences of our transaction to change depending on when or to whom it is submitted, chances are that web3.eth.estimateGas returns wrong values.